Translate

Saturday, April 25, 2015

Flowers everywhere

Hello,
As you can see, it is very springy here. We are spending as much time outside as possible theses days. I’m happy none of us are suffering from any allergies, and I’m so sorry for my brother and many others who do, and so can’t enjoy it, as there is soooo much beauty everywhere.


All this warm weather has got me thinking about the vest, I crocheted for myself six years ago while expecting my baby. I thought, you might find this pattern interesting for coming summer.


Circular vest pattern


Size: EU 38 – 42 (UK 10 – 14)
Cca 110cm ( 44” ) in diameter

Materials: 550g of any 100% cotton (120m on 50g)
Hook size H/5mm
Button, needle


Note: The material you can use is really up to you. It doesn’t need to be cotton as long as it is suitable for 5mm hook, it wouldn’t affect the size much.


Vest:
Ch 8, slst. to form the circle.
Follow the chart.
In rows 20 and 21 you should have 364 st.
In row 22 sc together equally 4times = 360 st., so the pattern works.
After 29th row we should have 510 st.
In row 30 we skip 48dcs for armholes from previous row (you can see it on the chart) and do 48ch instead. Follow by crocheting 79 sc’s and make another armhole same way as the first one and keep following the chart.
Finishing:
Sew the button on wrong side of the vest, cca 5cm from start of row 48. It’s marked on the top of the chart by a little arrow.

Don’t be scared. It only looks difficult, but when you’ll get into the pattern, you’ll find it easy.
Clara


Sunday, April 19, 2015

Feeling Patriotic

Hello,
I was thinking for a while about a nice decorative pillowcase. There are so many patterns to choose from, I couldn’t make up my mind. I was thinking about something a little bit patriotic since the royal baby is going to born soon. Than I saw the little squares on Lucy’s blog. I have to admit, I was a bit discouraged by the amount of sewing and tiding up the lose ends I would have to do, but I wanted to make a Union Jack pillowcase using those little squares. So I came up with a different way to put them together. It’s just requiring little bit less needlework.


Union Jack/denim pillowcase pattern

Finished size: 40cm x 40cm (16”x 16”)
Crochet Union Jack flag: 34cm x 34cm (13,5”x 13,5”)

You need: 
I used cca 50 grams of dark red, 50 grams of off white and 50 grams of dark blue cotton
Crochet hook E/3,5mm
Yarn Needle 
A pair of jeans size 14 or bigger or guy’s jeans (preferably not stretchy ones). 
3 buttons

Terms/Abbreviations: I used US terminology
ch       chain 
slst      slip stitch
sc       single crochet
dc       double crochet 
st        stitch 
sk       skip

This is the chart, which I followed. You start in the top left-hand corner, working horizontally.

First square:
Ch4, slst. to 4th ch from the hook (form the ring), ch3, 2dc’s into the ring, ch3, 3dc’s into the ring, ch3, 3dc’s into the ring, ch3, 3dc’s into the ring, ch3, slst into the 3th ch from the first ch3 group.

Connecting the squares:


Ch4, slst. to 4th ch from the hook (form the ring), ch3, 2dc’s into the ring,


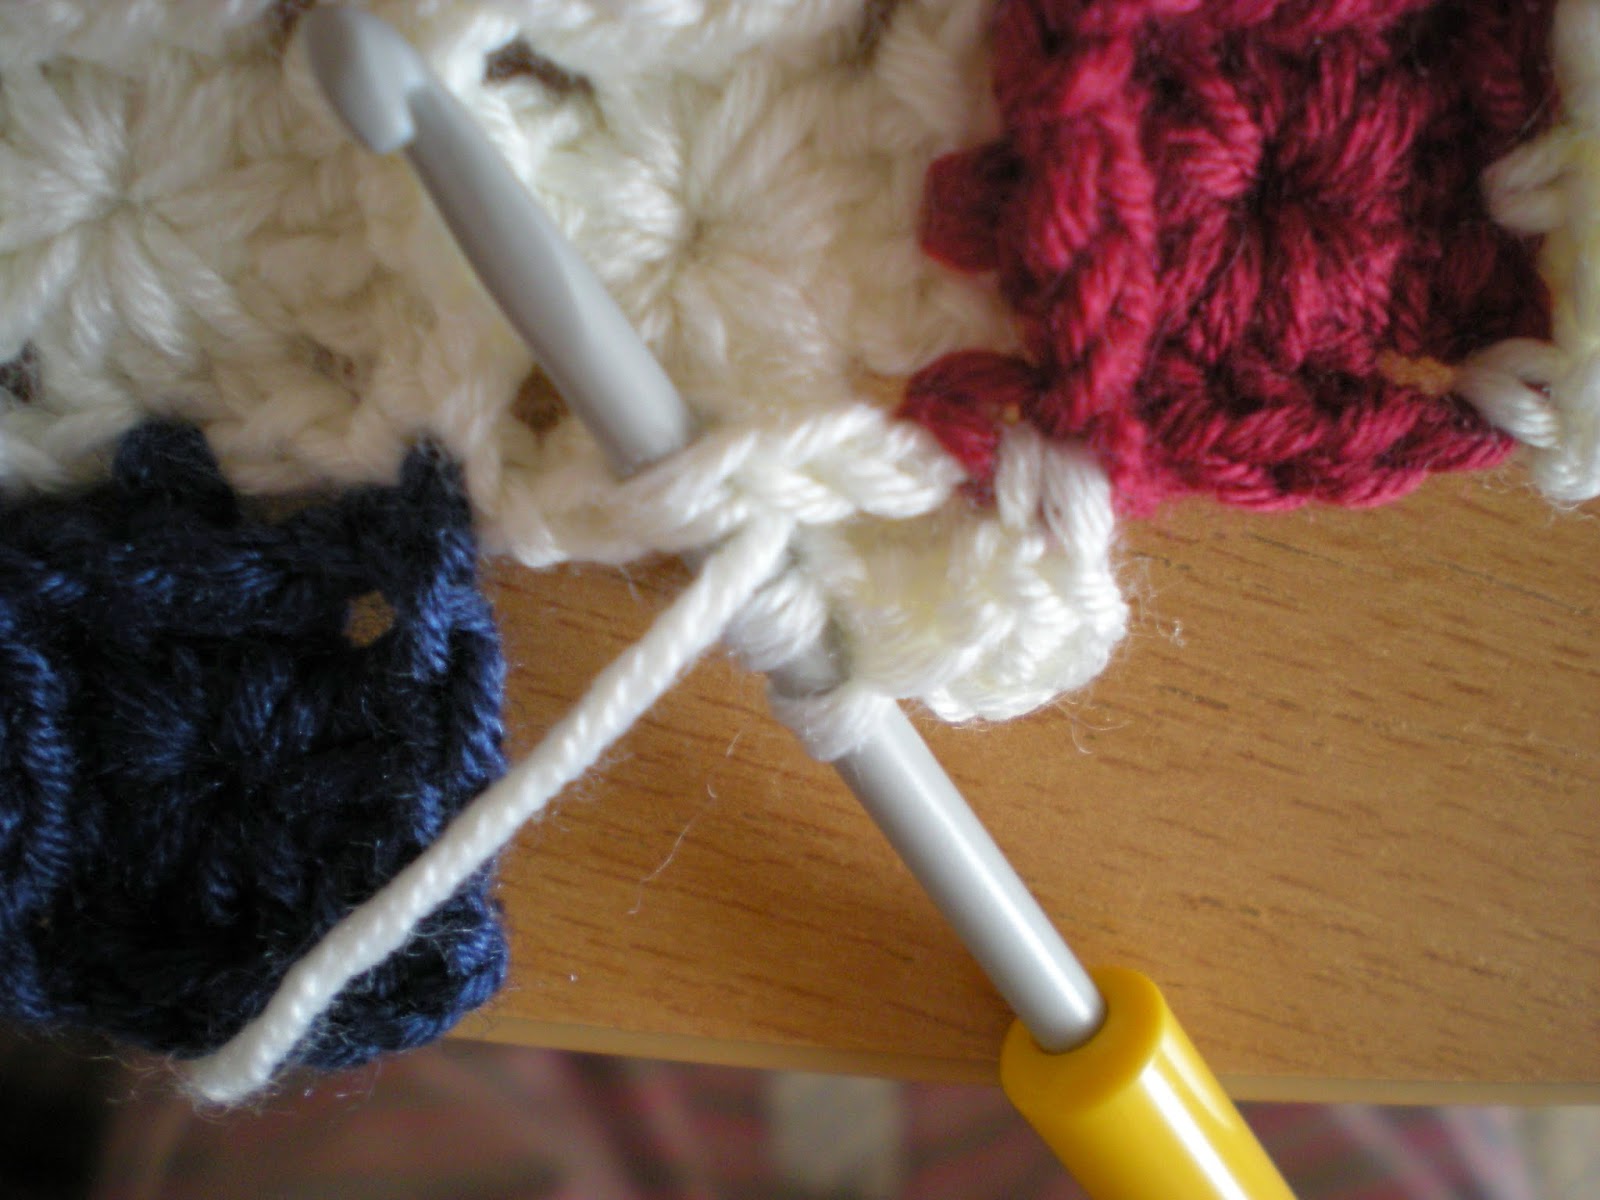
ch1, sc into the corner of top squares (see picture), ch1,


dc into the ring, start to do second dc into the ring,


right before you finish the second dc insert the hook into middle dc from top square (see picture),


with the cotton on the top, pull through (you have three loops on the hook),


yo and pull through all three loops, third dc into the ring, ch1,


sc into the corner of top and side squares (see picture), ch1,


dc into the ring, start to do second dc into the ring, right before you finish the second dc insert the hook into middle dc from top square (see picture), with the cotton on the top pull through (you have three loops on the hook), yo and pull through all three loops, 


third dc into the ring, ch1,


sc into the corner of side squares (see picture), ch1,


3dc’s into the ring, ch3,


slst into the 3rd ch from the first ch3 group. You have to trim the loose ends now, after every finished square. (It’s time consuming, but faster than sewing each square separately.)


All together 196 little squares, measuring all together cca 34cm x 34cm (13,5”x 13,5”).
Steam iron it, just be careful if you are using anything else than cotton.

Jeans/denim pillowcase:
For the actual pillowcase I used pair of jeans I bought after my daughter was born. I had them on couple of times, but I got a bit smaller quite soon. However I kept them in the wardrobe as a reminder of my size. It gave me great pleasure to cut them up and use them for something more useful, plus they were just perfectly suitable for this kind of project.
You can really use any kind of suitable fabric, but I used this old/new pair of jeans, because I hope I won’t ever need this size again.

Cut the jeans so it gives you one/front square measuring 41cm x 41cm (16,5”x 16,5”) or the size you would like your pillowcase to be. If you have to sew the bits of jeans together to get the right size, don’t worry, it won’t be visible much since you will sew the crochet square on it.
Pin the crochet square centrally on a right side of your jeans square and sew it on by sewing machine. Steam iron it again if needed (I did).


The back of the pillowcase looks like this. I cut two pieces of jeans (make sure they are nice pieces) measuring 41cm x 25cm (16,5”x 10”). Sew all parts together wrong side up as you can see on the picture. I put three buttons on back of my pillowcase.


You should end up with interesting, little retro, pillowcase. Don’t be scared, if you are not very good in sewing. Personally, I can sew just straight lines and I did it and I like it a lot. The case is not exactly 3D, but it does have very nice texture.


************************************************

Have nice week
Clara

Saturday, April 11, 2015

Union Jack purse

Hello,
Today I’d like to show you some of the knitting I did. I have to say up front, I’m not a knitter. I’m crocheter with all my heart, but from time from time I’m having little affair with knitting. I started when I was a teenager and I watched my mum knitting all the time, but I had “more important” things to do than, as we all had.
Not long ago I made this Knitted heart shawl you could see here previously posted already.


After I finished this shawl, I didn’t feel any more experienced than I was before, but it hasn’t stopped me coming up with something of mine own. By now you know that I love making the purses and bags of any kind. So I came up with this knitted Union Jack purse.


I have to admit it was very hard for me. I had to learn first how to knit together more colors. You Tube helped me a lot. If you, like me, would like to make this purse, but are not blessed with advanced knitting skills, You Tube is the way to go, plus a bit of dedication, and you are off to a good start. 
Don’t get discourage if you can’t knit much, it shouldn’t stop you.


Union Jack purse - pattern


Size: 
width 35cm x height 38cm (14”x 15”), handles cca 60cm (24”)
You need: 
I used cca 250 grams of red, 50 grams of off white and 50 grams of red/off white/orange multicolor yarn suggested for 4mm needles.
Straight needles 4mm
Yarn Needle 
Around 40cm x 90cm (16” x 36”) of cotton for the lining (you don’t have to use cotton)
30cm (12”) zipper


Stitches used:
K     knit, p     purl

The purse is worked from bottom up. The chart is showing all rows – right side (RS) and wrong side (WS).
The Union Jack and the Crown are worked K on RS, p on WS only. Grey windows on the chart (except the first row) are worked K on RS, p on WS.
All the backside of the purse and most of the front are worked in seed stitch (K1, p1 on the first row, and on all successive rows, K the P's and P the K's).


Front of the purse:
Cast on 65sts + 1 end stitch from each side.
Row 1: K1, p1 on the first row
Rows 2-6: K the p's and p the K's
Row 7: Starting stitch, 14 K the p's and p the K's, 37 K on RS, 14 K the p's and p the K's, end stitch.
Rows 8- 94: follow the chart
Row 95: RS, K  all K's and p's
Row 96: WS, p's

Back of the purse:
Cast on 65sts + 1 end stitch from each side.
Row 1: K1, p1 on the first row
Rows 2-94: K the p's and p the K's
Row 95: RS, K  all K's and p's
Row 96: WS, p's

Sew the sides and the bottom together now.

Handles: 
I used handles that I took of a purse I found in my favourit charity shop. I didn’t intended to do it, but when I saw the purse, which was perfect color and size match, for less than £1, I had to. I sewed the handle between the purse top and lining.

Lining:
I recommend lining this purse, but is not required. It will help the bag to keep its shape better, and show off the knitted pattern!
I put a lining in most of my purses.  I’m sewing it in by hand, to the second last round of the purse’s body. I suppose, you can sew the lining by machine. I just don’t know how visible it’ll be from outside.


Zipper:
I’m adding zippers to most of my purses as well. Usually I put the zipper in at the end.
I sew a piece of fabric to the sides of zipper, and sew it in after I have put the handles and lining in.


There it is. You should have nice purse now, or an inspiration for one at least.
I hope you understand the way I wrote this pattern. If you come up with any problems or difficulties, write to me, and I’ll be more than happy to help.

Have a nice week
Clara

Friday, April 3, 2015

Easter decorations

Hello,
I’m trying to stay in contact with England as much as I can.  A few months ago at the local library the Bridge club opened classes, so I signed up. Every Tuesday evening we’re meeting at the library learning the game. I have to admit it’s harder than I thought, but I’m progressing (very slowly). I met interesting people and found out, that the Junior world Bridge champion of last year, is boy from this town. I’m in the right place to learn from the best.
In this bridge class I met ladies who are organizing all sort of charity projects. I decided to help with my little bit as well. It is meant to be for Easter and for the children. I found these beautiful bunnies and made around 40 of them. They are going to be given to the children together with Easter eggs on Easter Monday.
I would like to thank to Doni for supplying this very easy to follow pattern.


With my little Angel we visited the Easter markets on the main square. It was even warm enough for an ice cream.


It wouldn’t be Eater in this part of Europe without the Easter sheep cake. It’s very traditional baked sponge cake. There are even competitions between people and villages regarding who’s gonna make the best one, biggest one, or the most interesting one.


I can’t help but share with you few little Easter things Angel made in her nursery and in her art class. I’m a sooooo proud mummy.


Of course we do buy chocolate eggs, but we are making our own non chocolate decorated eggs as well, using various techniques. The decorating and painting of eggs is another custom around here.


*********************************************************

I found these simple charts in some old magazines in my grandma’s attic. I think it’s a nice decoration, not for the kitchen only.


Filet eggs decorations - charts
Cca 13 cm x 16 cm ( 6,5 “ x 8“).

You need:
Aunt Lydia’s Classic Crochet (size 10), or any kind of suitable cotton
Crochet hook 1.25mm – 1.5mm
Tapestry needle

Chart Key
space   (ch 2, skip 2 sts, dc in dc)
block   (dc in dc, dc in next dcs or in next spaces)

Stitches used: (US terminology used here)
(ch)      chain 
(dc)      double crochet 

Row 1: ch 16 + 3 
Row 2: dc into 4th ch from the hook and follow the chart.


Happy Easter everybody
Clara